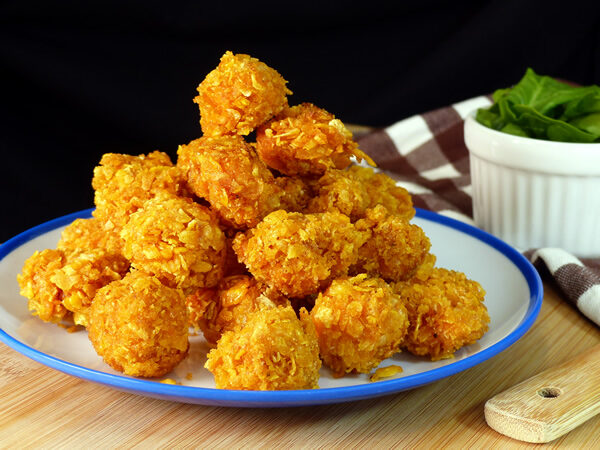
¿Has probado alguna vez las palomitas de pollo? También conocidas como «popcorn chicken» o «chicken nuggets», este irresistible plato consiste en pequeños trozos de pollo empanados y fritos, ¡una verdadera delicia para el paladar!
Su historia se remonta a principios de la década de 1990 en Estados Unidos, donde el tecnólogo de alimentos Gene Gagliardi, quien trabajaba para la famosa cadena de restaurantes KFC, ideó esta alternativa a las tradicionales alitas de pollo. Con su tamaño pequeño y fácil de comer, pronto se convirtieron en un éxito.
Desde su lanzamiento, estas crujientes y jugosas piezas de pollo han conquistado el gusto de personas de todo el mundo. Su sabor irresistible y su versatilidad para servirse como aperitivo, guarnición o plato principal las han convertido en un imprescindible en la mesa de muchas familias.
¿Qué las hace tan especiales? Su tamaño pequeño y forma irregular las distinguen de otras frituras de pollo, como las alitas o los nuggets. Además, su rebozado crujiente y su sazón perfecta las hacen irresistibles para cualquier amante de la comida rápida.
Y aunque es común encontrarlas en restaurantes de comida rápida como KFC o 100 Montaditos, ¿sabías que también puedes prepararlas en casa? Sí, así es. Puedes ajustar la receta según tu gusto, desde el tamaño y el marinardo, hasta el rebozado para un sabor aún más delicioso.
¿Te animas a probarlas? Son perfectas como aperitivo o complemento, acompañadas de alguna salsa irresistible. ¡Y no te preocupes por las cantidades de ingredientes! Puedes adaptarlas según la cantidad de pollo que utilices.
Y si te preocupa la salud, no te preocupes. Compartiremos contigo algunos trucos para hacer unas palomitas de pollo más saludables. ¿Y qué tal la idea de congelarlas para tenerlas siempre a mano? Así podrás cocinarlas en cualquier momento y disfrutar de su delicioso sabor.
Entonces, ¿qué esperas? ¡Anímate a preparar unas exquisitas palomitas de pollo y sorprende a tus seres queridos con este irresistible manjar!
Ingredientes para 20/25 unidades
- 1 pechuga de pollo
- 2 cucharadas de salsa barbacoa
- 1 cucharada de ajo en polvo
- 1 cucharada de orégano
- 3 cucharadas de harina de trigo
- 200ml de leche (1 taza)
- 30ml de jugo de limón (1/2 limón)
- 300g de copos/hojuelas de maíz tostados
- aceite para freír
Cómo hacer palomitas de pollo
- Comienza preparando una buttermilk. Para eso, agrega el jugo de limón a la taza de leche, remueve un poco y déjala reposar mientras sigues con el siguiente paso de tu receta.
- Corta la pechuga de pollo en trozos pequeños (de bocado). Una vez que los tengas listos, ponlos en un bol y después sazónalos con ajo en polvo, orégano y salsa barbacoa. Remueve hasta que todos los trocitos de pollo estén bien impregnados.
- Ahora, vamos a preparar el recubrimiento. Para ello, pon los copos de maíz en otro bol y tritúralos un poco con un mortero o almirez. Deben quedar en pedacitos irregulares de un tamaño pequeño, pero nunca los tritures tanto como para convertirlos en harina.
- Sigue con el proceso de empanado del pollo. Prepara 3 recipientes o boles en los que pondrás harina de trigo, los copos de maíz triturados anteriormente y la buttermilk que preparamos al principio. Pasa los trozos de pollo uno a uno por la harina, luego por la buttermilk y finalmente por los copos triturados, siempre en ese orden. Debes presionar ligeramente (sin apretar) el rebozado para que se fije al pollo; si lo aprietas demasiado, el pollo quedará apelmazado y no queremos eso.
- Aunque podrías freírlos ahora mismo, te recomiendo que los lleves al refrigerador durante al menos 30 minutos. De esta manera, el rebozado adquiere firmeza y quedan mejor al freírlos.
- Pasado este tiempo, fríelos en aceite caliente a fuego medio. La temperatura del fuego debe ser moderada durante toda la fritura. Una vez que estén doradas, sácalas y déjalas reposar un par de minutos sobre una rejilla antes de servirlas.
Consejos para hacer palomitas de pollo perfectas
- Buttermilk: Deja reposar la buttermilk hasta que espese. Lo normal es que este proceso no se demore más de 5 minutos, pero puede tardar algo más. Así que no la uses hasta que la consistencia de esta no sea espesa.
- Marinado: Sazona el pollo y, si tienes tiempo, déjalo marinar al menos un par de horas en el refrigerador. Eso hará que la carne quede más tierna, jugosa y con mucho más sabor.
El empanado: Asegúrate de hacer un empanado firme que cubra todo el pollo, para que una vez fritas, las palomitas queden bien crujientes y jugosas. - Reposo antes de cocinar: Lo ideal es que, una vez que estén empanadas, las dejes reposar 30 minutos en el refrigerador. De este modo, el empanado será más compacto, firme y crujiente una vez hecho.
- La temperatura del aceite: No dejes que el aceite supere los 180ºC, ya que podrían quedar crudas en su interior.
- Déjalas reposar sobre una rejilla: Este tipo de rebozados es mejor dejarlos reposar en una rejilla, ya que sobre el papel de cocina pueden quedar húmedas y estropear el “crunch” de nuestro pollo frito.
Consejos para servir y disfrutar las palomitas de pollo
- Temperatura: Se sirven calientes, recién hechas, para disfrutar de su textura crujiente y sabor óptimo.
- Presentación: Puedes colocarlas en una fuente o bandeja grande para que los comensales se sirvan a su gusto.
- Acompañamientos: Combinan a la perfección con diversas salsas, como salsa de tomate, salsa de yogur casera, mayonesa casera, kétchup, salsa BBQ, salsa tártara o tu salsa favorita.
- Para una cena familiar: Acompáñalas con puré de patatas, ensalada verde o verduras asadas.
- En un wrap: Haz con ellas unas fajitas de pollo en una versión más crujiente y sabrosa.
- Son ideales como aperitivo: Puedes hacer con ellas algo distinto, por ejemplo, pincharlas en pequeñas brochetas con tomates cherry y mozzarella para un aperitivo fácil y delicioso.
- Para una versión más saludable: Puedes hacerlas al horno o en airfryer hasta que estén doradas y crujientes.
Cómo congelar las palomitas de pollo
- Congelado inicial: Una vez empanadas, colócalas en una bandeja asegurándote de que estén separadas entre sí. Luego, llévalas al congelador durante al menos 2 horas.
- Empaquétalas: Una vez congeladas, colócalas en un recipiente hermético o una bolsa de congelación. Asegúrate de que estén bien selladas para evitar la formación de cristales de hielo.
- Etiqueta y fecha: Escribe la fecha en la que las congelaste en el envase. Esto te ayudará a recordar cuánto tiempo llevan en el congelador.
- Congelación: Coloca el recipiente o la bolsa en el congelador. Se mantendrán bien durante aproximadamente 1-2 meses.
- Descongelación y cocinado: Cuando quieras disfrutarlas nuevamente, sácalas del congelador y fríelas o cocínalas en freidora de aire o en el horno, según prefieras.
